welcome: please sign in

Input

book: Create a structured PDF document with headings, chapters, etc.
webpage: Specifies that the HTML sources are unstructured (plain web pages.) A page break is inserted between each file or URL in the output.
continuous: Specifies that the HTML sources are unstructured (plain web pages.) No page breaks are inserted between each file or URL in the output.
Title of the document for the front page.
Extract the first heading of the document and use it as title. If checked the title field has no effect.
The title image or HTML page. These file has to be an attachments!
Specify document version to be displayed on the title page.
Intellectual property owner of this document.
Copyright notice for this document.
Information about who and when modified the document are applied at the end.

Output

Specifies the output format.
Grayscale document  Title page
Compression :   JPEG big images 

Page

 
User defined page size 
Choose one of the predefined standard sizes or select user defined.
Specifies the page size using a standard name or in points (no suffix or ##x##pt), inches (##x##in), centimeters (##x##cm), or millimeters (##x##mm).
Set the target browser width in pixels (400-1200). This determines the page scaling of images.
   2-Sided   Landscape


Specifies the margin size using points (no suffix or ##x##pt), inches (##x##in), centimeters (##x##cm), or millimeters (##x##mm). Keep empty for default value.
Left
Middle
Right
Sets the page header to use on body pages.
Left
Middle
Right
Sets the page footer to use on body pages.

Contents

Sets the number of levels in the table-of-contents. Empty for unlimited levels.
   Numbered headings Check to number all of the headings in the document.
Sets the title for the table-of-contents. Empty for default title.
Left
Middle
Right
Sets the page header to use on table-of-contents pages.
Left
Middle
Right
Sets the page footer to use on table-of-contents pages.

Colors

Enter the HTML color for the body (background).
Enter the image file for the body (background). These file has to be an attachments!
Enter the HTML color for the text.
Sets the color of links.
Enables generation of links in PDF files.

Fonts

Set the default size of text.
Set the spacing between lines of text.
Choose the default typeface (font) of text.
Choose the default typeface (font) of headings.
Set the size of header and footer text.
Choose the font for header and footer text.
Change the encoding of the text in document.
Check to embed font in the output file.

PDF

Controls the initial viewing mode for the document.
Document: Displays only the docuemnt pages.
Outline: Display the table-of-contents outline as well as the document pages.
Full-screen: Displays pages on the whole screen; this mode is used primarily for presentations.
Controls the initial layout of document pages on the screen.
Single: Displays a single page at a time.
One column: Displays a single column of pages at a time.
Two column left/right: Display two columns of pages at a time; the first page is displayed in the left or right column as selected.
Choose the initial page that will be shown.

Security

Check to number all of the headings in the document.
 Print   Modify
 Copy   Annotate
Specifies the document permissions.
Specifies the user password to restrict viewing permissions on this PDF document. Empty for no encryption.
Specifies the owner password to control who can change document permissions etc. If this field is left blank, a random 32-character password is generated so that no one can change the document.

Expert

Specify language to use for date and time format.
Shrink code blocks on page.
Show line numbers for code blocks.
Make spaces visable by dots (·) instead of white spaces.
Make line breaks visable by a extra character (¶) at the end.
Enable this feature if you searching for problems or intent to report a bug report

About

Version 2.4.2 (MoinMoin 1.9.9)


MoinMoin - Generate PDF document using HTMLDOC

This action script generate PDF documents from a Wiki site using
the HTMLDOC (http://www.htmldoc.org) software packages which has
to be preinstalled first.

Copy this script in your's MoinMoin action script plugin directory.

Thanks goes to Pascal Bauermeister who initiated the implementaion.
Lot of things changes since then but the idear using HTMLDOC is the
main concept of this implementation.

Please visit the homepage for further informations:
http://moinmo.in/ActionMarket/PdfAction

@copyright: (C) 2006 Pascal Bauermeister
@copyright: (C) 2006-2010 Raphael Bossek <raphael.bossek@solutions4linux.de>
@license: GNU GPL, see COPYING for details


location: Middleware / MpiStart / MultiCore

Multicore and MPI-Start

MPI-Start uses by default the exact number of processes as slots allocated by the batch system, independently of the node they are located. While this behavior is fine for simple MPI applications, hybrid applications need better control of the location and number of processes to use while running.

MPI-Start 1.0.4

Since mpi-start 1.0.4, users are able to select the following placement policies:

Being the last one the most appropriate for hybrid applications. The typical use case would be starting 1 single process per node and at each node start as many threads as allocated slots are available within that node.

Total Number of Processes

In order to specify the total number of processes to use, mpi-start provides the -np option or the I2G_MPI_NP environment variable. Both methods are equivalent.

For example to start an application using exactly 12 processes (independently of the allocated slots):

   1 export I2G_MPI_APPLICATION=myapp
   2 export I2G_MPI_APPLICATION_ARGS=arg1 arg2
   3 export I2G_MPI_TYPE=openmpi
   4 export I2G_MPI_NP=12
   5 
   6 $I2G_MPI_START

or using the newer syntax:

mpi-start -t openmpi -np 12 myapp arg1 arg2

The location of the processes is determined by the MPI implementation that you are using. Normally a round-robin policy is followed!

Processes per Host

Exclusive Execution

It is convenient to run your applications without sharing the Worker Nodes with other applications. Otherwise they can suffer for bad performance. In order to do so, in EMI CREAM you can use WholeNodes=True in your JDL.

As with the total number of processes, both command line switches and environment may be used. In this case there are two different options:

For example, to start an application using a 2 processes per node (independently of the allocated slots):

   1 export I2G_MPI_APPLICATION=myapp
   2 export I2G_MPI_APPLICATION_ARGS=arg1 arg2
   3 export I2G_MPI_TYPE=openmpi
   4 export I2G_MPI_PER_NODE=2
   5 
   6 $I2G_MPI_START

or:

mpi-start -t openmpi -npnode 2 myapp arg1 arg2

In the case of using a single processes per host, the Open MP hook (defining MPI_USE_OMP=1) may be also used in order to let MPI-Start configure the number of OpenMP threads that should be started:

   1 export I2G_MPI_APPLICATION=myapp
   2 export I2G_MPI_APPLICATION_ARGS=arg1 arg2
   3 export I2G_MPI_TYPE=openmpi
   4 export I2G_MPI_SINGLE_PROCESS=1
   5 export MPI_USE_OMP=1
   6 
   7 $I2G_MPI_START

or:

mpi-start -t openmpi -pnode -d MPI_USE_OMP=1 myapp arg1 arg2

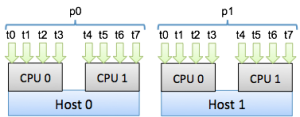
This is the typical case of hybrid MPI/OpenMP application. In the figure, an application executing in two different hosts with 2-quadcore CPUs is shown. Each host will have a MPI process (named p0 and p1) and one thread for each of the CPU cores available (from t0 to t7).
pnode.png

MPI-Start will define the OpenMP threads to 8 and start only one process at each host.

MPI-Start 1.0.5

MPI-Start 1.0.5 introduces more ways of controlling the processes placement. The previous options are supported, and 2 new more are available: start one process per socket and start one process per core.

MPI-Start assumes the whole host is allocated to the application execution in these cases!

Process per socket

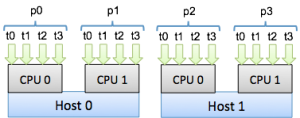
Start one process per CPU socket (threads would be started per each core in the CPU), with the -psocket option. As shown in the figure for two hosts with 2-quadcore CPUs, MPI-Start would start 2 different processes in each host and one thread per core.
psocket.png

The following example shows how to run an application using this feature:

   1 export I2G_MPI_APPLICATION=myapp
   2 export I2G_MPI_APPLICATION_ARGS=arg1 arg2
   3 export I2G_MPI_TYPE=openmpi
   4 export I2G_MPI_PER_SOCKET=1
   5 export MPI_USE_OMP=1
   6 
   7 $I2G_MPI_START

or:

mpi-start -t openmpi -psocket -d MPI_USE_OMP=1 myapp arg1 arg2

Process per core

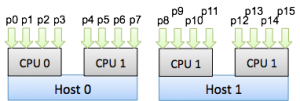
Start one process per core (no threads), with the -pcore option. The figure depicts this case
pcore.png

See the example on how to use this option:

   1 export I2G_MPI_APPLICATION=myapp
   2 export I2G_MPI_APPLICATION_ARGS=arg1 arg2
   3 export I2G_MPI_TYPE=openmpi
   4 export I2G_MPI_PER_CORE=1
   5 export MPI_USE_OMP=1
   6 
   7 $I2G_MPI_START

or:

mpi-start -t openmpi -pcore -d MPI_USE_OMP=1 myapp arg1 arg2

CPU Affinity

MPI-Start 1.0.5 introduces a new hook for supporting CPU affinity in Open MPI as described in their FAQ. In order to enable it, define MPI_USE_AFFINITY to 1. You need to specify also per core/node/socket placement of the processes otherwise the hook will not be able to determine how to assign the processes to CPUs.

The assignment of CPUs to process is done in the following way:

Do not run more than one application in the same nodes when using CPU Affinity. This can lead to a serious degradation in performance